TEST THE LIT ASSEMBLY
A white sample cannot approve a backlit panel.
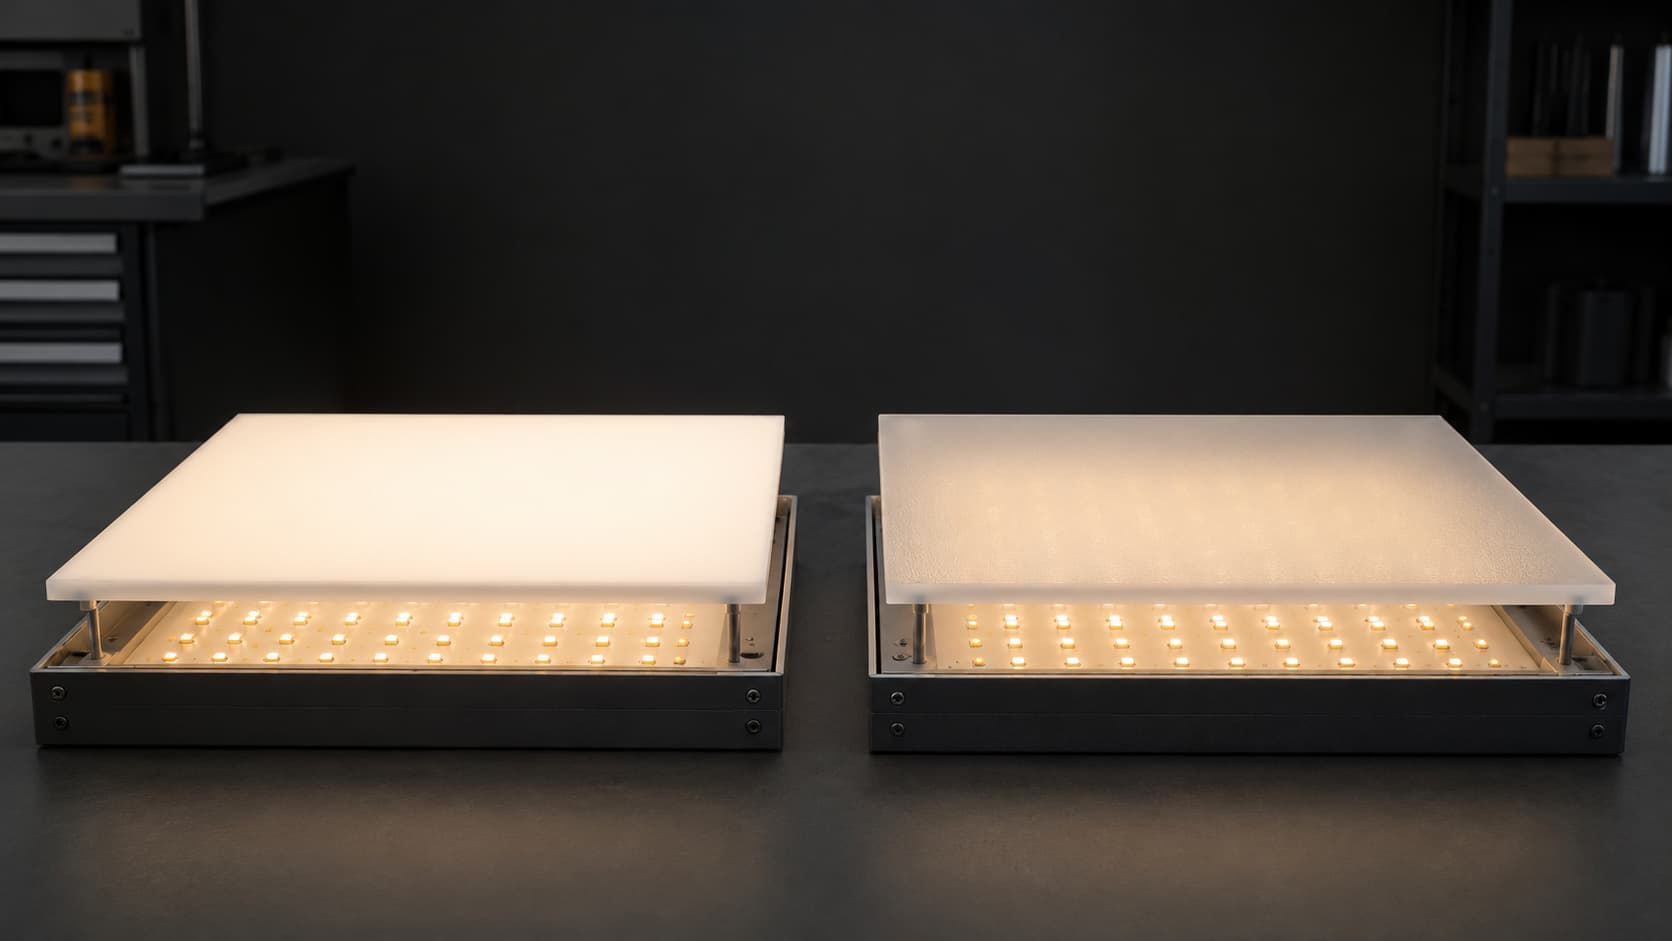
Opal and frosted acrylic may look similar on a sample table. Once the LEDs switch on, one may reveal every diode while the other hides the source but gives up more output.
The label names the sheet. The lit assembly proves the diffuser.
Then validate either choice with the actual LED layout, cavity, thickness, and viewing conditions.
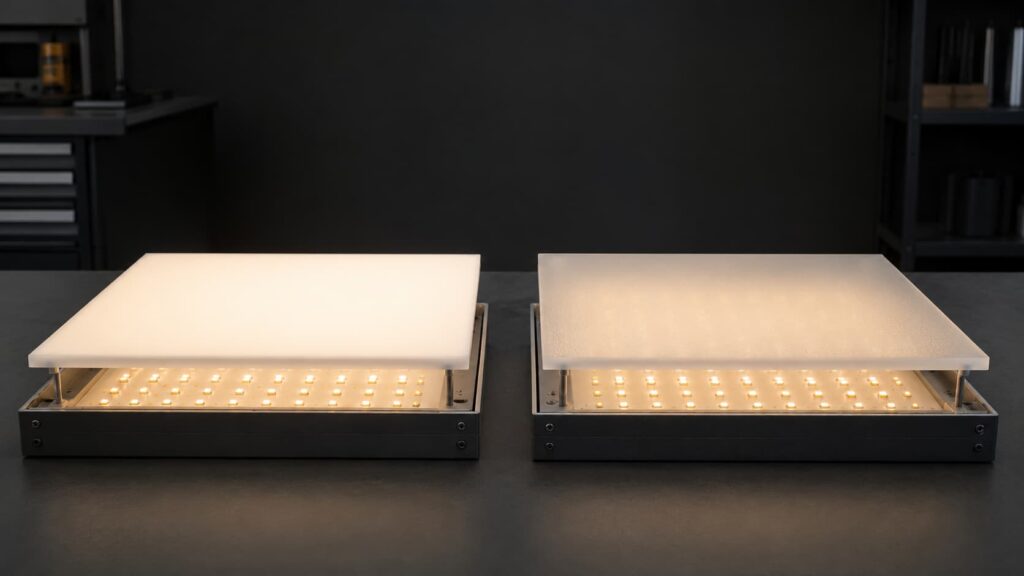
A sheet can look softly white before installation and still reveal every LED when the cabinet is switched on. Another may hide the light source beautifully but reduce so much output that the illuminated face looks dull.
That is why choosing between opal and frosted acrylic is not simply a question of which material looks whiter or feels more matte. The practical decision is a balance between light-source concealment, useful brightness, unlit appearance, and the geometry of the finished assembly.
Quick Answer: Choose the Optical Job Before the Sheet Name
Choose frosted acrylic as the starting point when the LEDs already have enough space to mix and maintaining brightness is the priority. Start with opal acrylic or an engineered diffuser grade when individual LEDs, wiring, or internal hardware must be concealed.
Neither option is approved until it is tested in the representative illuminated assembly. The acrylic sheet cannot create setback distance, rearrange widely spaced LEDs, or correct an uneven cavity by itself.
Opal and Frosted Are Not Complete Optical Specifications

Frosted acrylic usually describes a clear or translucent acrylic sheet with a matte texture on one or both surfaces. That texture scatters some transmitted light, reduces sharp reflections, and softens the view of objects behind the panel. It can create a pleasant glow, but ordinary frosted acrylic does not automatically hide closely spaced or directly viewed LEDs.

Opal acrylic usually describes a translucent white or milky grade. It generally provides more concealment than a lightly frosted clear sheet, making it a stronger starting point for lightboxes, illuminated panels, and covers where the source should not remain visible.
The names are not standardized performance classes. One supplier’s “opal” may differ from another in light transmission, color, haze, thickness, and LED-hiding ability. Engineered diffuser products may also combine a specialized material formulation with matte or textured surfaces. Original material manufacturers therefore separate acrylic grades intended for backlighting, edge lighting, sign faces, and general frosted applications.[1][2][3]
A useful starting description, but not an illuminated acceptance standard.
Add relevant optical data where available, visible-face orientation, and the approved assembly conditions.
If the project is mainly about privacy or visibility rather than hiding LEDs, the separate guide to clear vs. frosted acrylic provides the more relevant comparison. The distinction between transparent, translucent, and opaque materials is covered in the acrylic optical classification guide.
Opal vs. Frosted Acrylic at a Glance
The comparison below describes useful starting tendencies—not guaranteed performance for every sheet sold under either name.
| Decision Point | Frosted Acrylic | Opal Acrylic |
|---|---|---|
| Typical appearance | Clear or translucent with a matte surface | Milky, translucent white, or colored |
| Light-source concealment | Moderate; LEDs may remain visible | Generally stronger, depending on grade |
| Relative light output | Usually higher | Usually lower as concealment increases |
| Surface character | Matte texture may be one-sided, two-sided, or directional | May be glossy, matte, or specially textured |
| Unlit appearance | Internal shapes may remain partly visible | Better starting point for hiding internal components |
| Best starting use | Softening an already mixed light source | Direct-view panels and stronger hotspot control |
| Main risk | A bright panel that still shows LED dots | A uniform panel that is dimmer than required |
Why LED Hotspots Are a System Problem
The final illuminated surface is created by several variables working together: the acrylic grade and thickness, the LED pitch and layout, the distance between the LEDs and the sheet, the cavity geometry and internal finish, and the expected viewing distance and angle.
Closely spaced emitters are generally easier to blend than widely spaced points. More distance also gives the light from neighboring LEDs room to overlap before it reaches the acrylic. This explains a common project failure: the same frosted sheet can work in a deep lightbox and fail in a shallow one.
Changing to opal acrylic may improve concealment, but it is not the only possible correction. The project may also need a different LED layout, more setback distance, a reflective interior, or an application-specific light-diffuser acrylic.
Which One Fits the Application?
Deep lightboxes and backlit display panels
If the LEDs are evenly distributed and positioned far enough from the face, frosted acrylic may provide sufficient softening while retaining more useful brightness.
Shallow or directly viewed LED assemblies
When the cavity is shallow, the panel is viewed closely, or individual diodes must disappear, opal acrylic is usually the safer starting point. An engineered diffuser grade may be more reliable for demanding projects.
Decorative lighting covers
If the goal is to reduce glare and soften the surface without completely hiding the form of the source, frosted acrylic may offer the better balance. Its matte finish can also be part of the unlit design.
Repeat OEM lighting components
Specify the grade, thickness, visible surface, processing method, and illuminated reference sample. A controlled grade is more useful than approving only the words “opal” or “frosted.”
Four Common Selection Mistakes
1. Approving an unlit sample
Two sheets may look nearly identical under office lighting and behave very differently in front of LEDs. An unlit white sample cannot approve a backlit panel.
2. Comparing sheets under different conditions
Changing the LED strip, sheet distance, camera exposure, or ambient light between photographs makes the comparison unreliable. Samples must be evaluated in the same assembly under the same settings.
3. Choosing the highest transmission or haze value
Luminous transmittance and haze describe different optical characteristics.[4][5] Neither measurement alone tells you whether the installed face will appear uniform. More transmission may preserve brightness while revealing the LEDs; more diffusion may improve uniformity while reducing useful output.
4. Treating thickness as the only fix
Thickness can change the balance between transmission and diffusion, but it cannot compensate for every poor LED layout or inadequate cavity depth. Compare the actual available grades instead of assuming that a thicker sheet must perform better.
How to Validate the Material Before Production
A useful diffuser test reproduces the finished assembly as closely as practical. It evaluates both the acrylic and the lighting conditions that the acrylic must manage.
- 1
Lock the light source
Use the intended LED type, color temperature, pitch, layout, and operating level.
- 2
Reproduce the space
Build the planned setback distance, cavity geometry, and representative internal finish.
- 3
Compare controlled samples
Use the proposed grades and thicknesses without changing the surrounding test conditions.
- 4
Inspect on and off
Check hotspots, bands, brightness, color appearance, visible hardware, and the expected viewing angles.
- 5
Approve the processed part
Record the accepted grade, thickness, surface orientation, fabrication, and illuminated reference condition.
Fabrication and Batch Considerations
If the component will be cut, printed, bent, thermoformed, or assembled, approve a processed sample rather than only a raw sheet coupon. Openings, finished edges, graphics, adhesives, and changes in geometry can create local bright or dark areas that a flat sample does not reveal.
For one-sided frosted acrylic, record which surface faces the viewer and which faces the LEDs. Keep protective masking in place through compatible processing stages, and define the acceptable surface condition before production begins.
For repeat orders, retain the material reference, thickness, approved lit and unlit appearance, processing details, and representative sample. One successful prototype proves that the assembly can work; a controlled specification makes the result easier to repeat.
What to Send for a Material Review
A useful inquiry describes the illuminated assembly rather than asking only for “opal white” or “frosted acrylic.”
DIFFUSER PROJECT BRIEF
Send the conditions the sheet must manage.
- Application
- Lightbox, lighting cover, illuminated panel, sign face, or OEM component
- Lighting
- LED type, pitch or layout, color temperature, and distance from the acrylic
- Acrylic
- Required thickness, finished dimensions, surface, and desired lit and unlit appearance
- Part
- Flat or formed geometry, printing, openings, edges, and visible-face requirements
- Order
- Quantity, drawing or reference image, packaging needs, and delivery destination
Frequently Asked Questions
Is opal acrylic always better than frosted acrylic for LEDs?
No. Opal is generally a better starting point for concealing the source, but frosted acrylic may retain more useful output. If the LEDs are already well mixed and not viewed directly, the extra concealment of an opal grade may not be necessary.
Will frosted acrylic completely hide LED dots?
Not reliably. The result depends on the frost level, thickness, LED pitch, panel distance, cavity design, and viewing conditions. Closely positioned LEDs may remain visible through an ordinary frosted sheet.
Does thicker acrylic provide better diffusion?
Thickness can affect both transmission and diffusion, but the result is grade-specific. A thicker sheet should not be treated as a universal correction for visible hotspots or an inadequate lighting cavity.
Are haze and light transmission enough to select a diffuser?
They are useful comparison data, but they do not describe the complete illuminated assembly. LED layout, setback distance, thickness, viewing conditions, and surface treatment must still be evaluated.
Can ordinary translucent white acrylic replace an engineered diffuser grade?
Sometimes. A general opal or translucent white grade may perform adequately in a deeper lightbox or less demanding application. For shallow assemblies, close viewing, or repeat OEM production, an LED-optimized grade and physical sample approval provide a more reliable basis.
Conclusion: Choose the Lit Result, Not the Sample Name
Frosted acrylic is usually the better starting point when brightness and a matte surface are important and the light has enough space to mix. Opal acrylic is usually the stronger starting point when LEDs, wiring, or internal structure must be concealed.
Neither name guarantees the result. The final choice must be tested with the intended acrylic grade, LEDs, spacing, cavity depth, thickness, viewing conditions, and fabrication.
FROM MATERIAL LABEL TO LIT APPROVAL
The label starts the comparison. The illuminated sample finishes it.
Grandview Acrylic can supply full sheets, cut-to-size panels, and drawing-based acrylic components for lighting and backlit projects. Send the lighting layout, panel dimensions, thickness, required appearance, drawing, and order quantity for review.
Send Your Lighting DetailsTECHNICAL SOURCES
References and Further Reading
- [1]PLEXIGLAS® LED
Source: PLEXIGLAS® / POLYVANTIS. Shows that acrylic grades for backlighting, edge lighting, and side lighting are treated as different optical product systems.
View Source - [2]ACRYLITE® LED
Source: ACRYLITE® / POLYVANTIS. Describes LED-specific PMMA products, including backlit, edge-lit, and diffused sign-grade materials.
View Source - [3]OPTIX® LED PXT Lighting Diffusers
Source: Plaskolite. Demonstrates that an engineered diffuser may combine controlled light transmission and diffusion with matte textured surfaces.
View Source - [4]ASTM D1003 — Haze and Luminous Transmittance of Transparent Plastics
Source: ASTM International. Supports treating haze and luminous transmittance as separate measured optical properties.
View Source - [5]ISO 13468-1:2019 — Determination of Total Luminous Transmittance
Source: International Organization for Standardization. Provides a standardized basis for measuring total luminous transmittance within its stated scope.
View Source
Material names, optical values, thicknesses, outdoor suitability, processing behavior, and production availability remain grade- and project-specific. Confirm the applicable technical data and representative illuminated sample before production.